Ever hung up a shiny new classroom sound wall only to realize it’s basically turned into wallpaper? Don’t worry, you’re not alone! A lot of teachers love the idea of a sound wall, but without clear routines, it ends up taking up prime real estate on your wall without pulling its weight in instruction and practicality.
Here’s the truth: a classroom sound wall should be one of the hardest working tools in your classroom. When used with intention, it supports phonemic awareness, spelling, and independent problem solving. Let’s talk about how to make your sound wall go from “just decor” to a daily learning tool.
The Problem: Classroom Sound Walls That Just Sit There
Sound walls are powerful, but often teachers are overwhelmed with the huge amount of content that’s presented in the display. So instead of it becoming an interactive tool as intended, it becomes a static display. The result is that students don’t actually use them, teachers don’t model them, and that big display just eats up your valuable wall space.

The Solution: Turn Your Classroom Sound Wall Into a Teaching Tool
Here are 10 Sound Wall Secrets that will transform your sound wall into something your students actually use every day.
#1 Teach It with Intention
Hanging it up isn’t enough. Your sound wall needs an introduction, just like any other instructional tool. Show your students how it works, explain that it’s there to help them with reading and spelling, and model how you’d like them to walk over, find a sound, and use it to solve a problem. For example, during writing, stop and say, “I’m not sure how to spell ____. Let’s check the sound wall!”
#2 Add Real Mouth Visuals
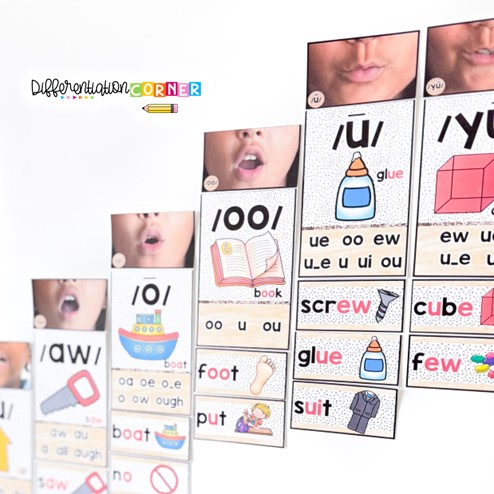
Many students need to see how a sound is formed, not just hear it. Mouth photos with each phoneme can provide that visual anchor, especially for those tricky pairs like /b/ and /p/. Pro tip: add a small mirror next to your classroom sound wall so that students can compare their own mouth with the visuals you’ve taught.

#3 Build It in Real Time
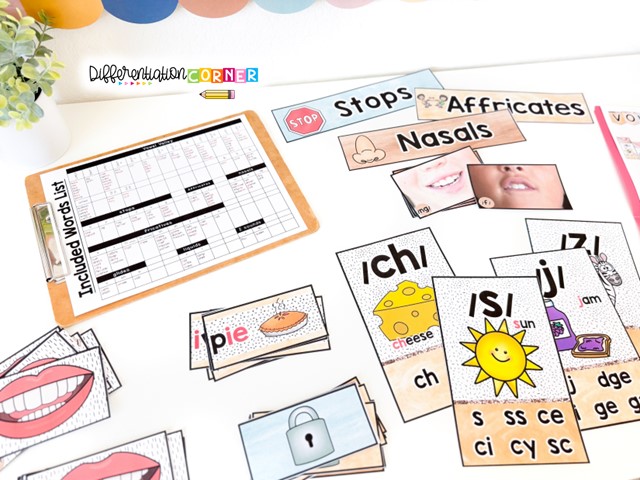
Cover the sounds that are too advanced for your grade level or sounds that you’ll introduce later on in the year. This way, the classroom sound wall grows right alongside your instruction. Students will be SO excited to “unlock” new sounds as they learn them, and you can build anticipation, novelty, and a sense of progress. It turns each new card reveal into a milestone moment. Plus, when students feel like they’re building the tool with you, it adds to the interactive nature of the sound wall and makes it something familiar.

#4 Pair Phonemes with Word Examples or Keywords
Every sound should have an example word that students know. Adding pictures with these keywords helps younger or struggling readers and spellers connect the sound to meaning. When students see the image, it helps them recall the sound and the letters to spell that sound.
#5 Keep It Interactive and Hands On
A static classroom word wall is easy to ignore. An interactive one gets used! I use those small sized sticky notes so students can add words that they discover in their learning. Students listen intently during read alouds and search for them in their independent reading. Sometimes during small groups or literacy rotations, I challenge them to find 3 new /sh/ words. I change it up between what I’ve noticed students struggling to spell and our current phonics focus.
#6 Highlight Those Tricky Vowels
Vowels truly deserve their own spotlight. Create a vowel valley that shows how vowels are made with an open mouth. Point out the difference between long and short vowel sounds, and why they can be tricky. For example, use your vowel valley to compare cap and cape so students see how a silent e changes everything!

#7 Use It Every Day
Make referencing the classroom sound wall part of your daily instruction. During phonics lessons, walk over and connect the phoneme to its place on the wall. When editing writing, encourage students to double check their spelling using their personal sound wall or walking over to the big classroom sound wall. Over time, the display becomes a natural extension of your teaching instead of a once in a while reference.
#8 Model Student Independence
The ultimate goal of a classroom sound wall is for students to use it without you prompting them. Keep modeling until you see kids doing it themselves. For example, when a student asks, “How do I spell “knight?” I respond, “Check the /n/ sound on the classroom sound wall.” Then check in with them to see what they noticed. Eventually, they’ll skip the question altogether and head straight for the wall on their own.
#9 Use It During Writing Conferences
When you hold writing conferences with an individual or a small group of students to review their writing, use the sound wall as a part of your conversation. Instead of telling them how to spell a tricky word, model how to find the tricky sound on the classroom sound wall. I hold my conferences near the display so we can access the cards quickly. They’ll eventually start doing this on their own during independent writing time.
#10 Provide Personal Sound Walls
Give each student a simplified, individual version of the classroom sound wall to keep at their desk, in a folder, or glued inside their writing notebook. These mini sound walls don’t need all the keywords, just the mouth photos, phonemes, and graphemes. When students are writing independently, they can quickly glance at their personal sound wall at their seat. This helps build confidence and reduces some of our students’ anxiety related to getting up in front of the class or asking for help. Individual sound walls definitely reinforce the habit of using the sound wall as a go to strategy!

Final Thoughts on Classroom Sound Walls
A sound wall is only as powerful as the routines you build around it. Once students know how to use it, you’ll see it become a go to reference for reading, spelling, and writing confidence.
My sound wall resources take the heavy lifting off your plate. Each set includes:
Premade keyword cards with visuals for every sound and spelling
Personal sound walls so students always have a reference at their desks
Locks to cover untaught sounds, keeping the wall growing right alongside your lessons
An editable template so you can add your own words or align with district requirements
With everything ready to go, you can spend less time creating your own and more time teaching. Your students will actually use the sound wall, and you’ll feel confident knowing it’s doing the job it’s meant to do.
Ready to set up a sound wall that actually works? Find your perfect classroom sound wall here!

Read all about how I teach: Silent Letters, Soft G & C, GE & DGE Endings, and Contractions.
